Thursday, March 31, 2011

From Baker's Rack to Wrapping Storage Center

One of the things I have really enjoyed about the new house is being able to have a craft room. I love having a space to just work on my projects not having to worry about cleaning up my mess when I am in the middle of something. I can just leave it as is and come back to it when I'm ready. However, I did want my space to be organized so I would be able to find the materials I need easily.


When setting up my craft room, I had a random assortment of furniture to create my workspace. In our old apartment we used a baker's rack in the kitchen due to limited storage for our pots and pans. Our new kitchen doesn't allow for space for the baker's rack (luckily we do have a place for pots and pans though!), so I tried to figure out a way to "repurpose" the rack and utilize it in the craft room.


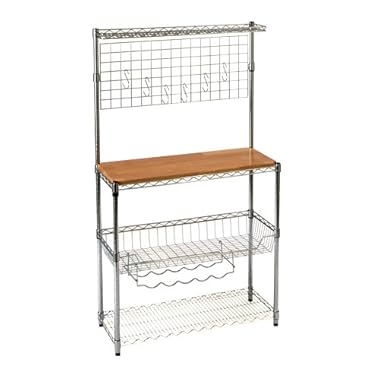
The baker's rack I had to work with (purchased at Target)
Looking around at the supplies I have, I thought the bottom racks would be the perfect storage for all my wrapping paper. I have several rolls that I had shoved in a bag in the closet. Why not tastefully display them for easy access?


The top of the baker's rack has a little shelf that would only hold lightweight items. Therefore, that's where I put my wrapping tools and small ribbon storage. I reused a sorbetto container (yum!) to contain my paper cutter, small scissors, extra tape strips, and tags. I love to recycle food containers.....they make great storage!


Next, I attached a small hanging basket (that I previously used in the pantry) to the wire backing to hold extra tape, dispensers, etc.


Finally, for the backing of the baker's rack, I created my favorite part of all....a ribbon rack! I had several rolls of nice ribbon that kept getting unraveled on my shelf. Luckily, I found a wooden dowel that my husband happened to have leftover from another project and it fit my spools of ribbon perfectly! 0.75 inch diameter...the exact size of the ribbon spool openings. I painted the dowel white with some paint we already had. Then, I one-by-one slid the rolls of ribbon onto the dowel. Finally, I used the S-hooks that were already on the rack to hold up the dowel with ribbon spools. The best part is that the grid backing perfectly held my ribbon in place....no more unraveling! The ribbon dispenses easily! As you may have noticed, I didn't use the wine rack yet....I am brainstorming on a cool storage idea for that. Let me know if you have any suggestions!


The final product! From baker's rack to wrapping center! 


My assistant :)


Tuesday, March 1, 2011

House Remodeling 101

The house we recently moved into is great; we love the location and our lake view. However, it needed some updates. The fixtures were brass, the carpets were dirty, the walls were bland. We didn't have any experience in remodeling and weren't exactly sure what we were getting ourselves into. After many phone calls, estimates, late nights painting, and headaches, the work was done and we are enjoying the new house! Here are some before and after pictures of the changes we made (with the help of a contractor).

 
Master bath. Changed the shower fixtures from brass to bronze. Tiled the shower.


Changed out the brass for bronze. Tiled around the tub.


Changed out vinyl to ceramic tile. New toilet.


Living room. Painted an orange accent wall around the fireplace.


Painted the kitchen orange (a favorite color of ours if you couldn't tell!)


Guest bath. Changed out vanity. New toilet, tile floor, and fixtures.


Master bedroom. From tan to blue. New fan and carpet.


Downstairs bedroom. From cream to a pretty blue (Spa- Sherwin Williams). Turned into a craft room.


Changed the dark red wall.


Kitchen. From tan to orange.


Another kitchen before and after.


More living room before and after.


Dining room from brown and tan to light green (Hearts of Palm-Sherwin Williams).